
Adding Pages to Menus
When you add Pages to your website, you’ll need to link to them somewhere for people to find them. One way is to add the link as part of your Menu Navigation. This page explains some of the basics for adding page links to your navigation menu.
Adding Items to a Menu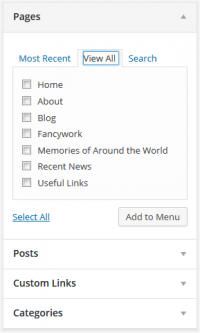

To add a Page to your Menu, do the following:
- From your Dashboard, navigate to Appearance > Menus
- Click on the Pages link in the menu to open the selection options
- Select the View All link to bring up a list of all the currently published Pages. You can also Search for a Page by name, even if you only remember part of it
- Select the Page that you want to add by clicking the checkbox next to the title
- Click the Add to Menu button
- Your selected Page will be be placed at the bottom of the Menu Structure
- Hover over the new link, then click and drag it up into the order that you prefer
- Indent the item slightly to the right, to make it a sub-item of a main link (a Multi-Level Menu item). Indent it more to make it a sub-item of a sub-item (see below for more information)
- Click the Save Menu button once you’ve added all the Pages you want
- Exit the Customizer when you are finished
Your menu has now been saved.
Note: The Screen Options allow you to choose which items you can use to add to a menu. Certain items, like Tags are hidden by default. If you do not see the Pages option, look in your Screen Options to make sure that “Pages” is checked to be available in your selection menu.
Deleting a Page Link From Your Menu

- Locate the Page that you want to remove in the menu editor window
- Click on the arrow icon in the top right-hand corner of the menu item/box to expand it
- Click on the Remove link. The menu item/box will be immediately removed
- Click the Save Menu button to save your changes
Customizing Menu Items
Navigation Label
This field specifies the title of the item on your menu. This is what your visitors will see when they visit your website.
By default, your Page Title will be used for the Navigation Label. Quite often, this title is too long to fit in your menu, and will cause your menu to wrap to multiple lines. Use this option to choose a shorter name for your link.
Original
A link to the original source of the menu item (e.g. a link to view the post or page).
The following items are hidden by default. Use Screen Options to show the required fields.
Title Attribute
This field specifies the Alternative (‘Alt’) text for the menu item. This text will be displayed when a user’s mouse hovers over a menu item.
Link Target
Select “Same window or tab” or “New window or tab” from the pulldown.
CSS Classes
Optional CSS Classes for this menu item
Link Relationship (XFN)
Allows for the generation of XFN attributes automatically so you can show how you are related to the authors/owners of site to which you are linking. See Link Relationship for details.
Description
Description for this link. The description will be displayed in the menu if the current theme supports it.
- Click on the arrow in the top right-hand corner of the menu item to expand it.
- Enter the values for the required fields that you want to assign to the item.
- Click the Save Menu button to save your changes.