
Adding Menus to Your Site
Your Cadenza website comes with a built-in Main Menu. This menu is used for your primary site navigation and you can add, delete or modify links as needed.
You can also create additional Custom Menus for other areas of your website, through Widgets or through the Page Builder. For example, you may want to create a custom menu of your Ensembles or Staff Members, and display that menu in a sidebar on your Ensembles or Staff pages. With a Custom Menu, you can select which links to pages, or posts you want to include, to help visitors navigate to specific, related content.
Creating a New Menu
In order to add a Custom Menu to your site, you must first create the menu, and add some links. To Create a new menu, do the following:
- From your Dashboard, navigate to Appearance > Menus
- At the top of the screen, click the link to Create a new menu
- Give your new menu a Name. The default Cadenza menu is named “Main”, so you must choose something different
- Click the Create Menu button
- You can add links now, or come back and add them later
- You may also select a Display Location now, under the Menu Settings heading, or follow the steps under the next section for Manage Locations
- Click the Save Menu button when you are finished
Manage Locations Option
- On the Menus main screen click the Manage Locations tab. This section is for selecting where you want your menus to appear. by Default, Cadenza assigns your Main navigation as the Header Menu. If you are adding a Custom Menu, you should elect to place it in either the Top Bar Menu, or the Footer menu.
- From either drop down, choose your new menu from the list.
- Click the Save Changes button
Menu Settings Option
- Scroll to the bottom of the menu editor window.
- In the section titled Menu Settings, click the check box for the location where you want your menu to appear. Cadenza supports three primary menu locations: Top Bar Menu, Header Menu & Footer Menu.
- Click Save menu once you’ve made your selection.
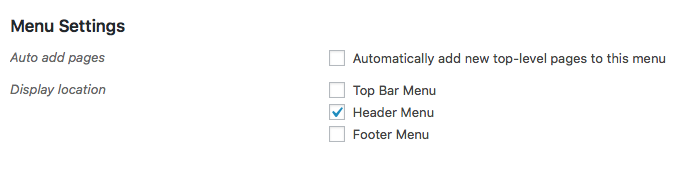
Menu settings allow you to select where you want your menu to appear and if you want to automatically add top level pages to the menu when you create them.
Adding Custom Menus in the Page Builder
If you use the Page Builder to create dynamic pages with Content Modules, then you can also add any menu to your page by using the any one of several Menu modules:
- Page Builder Menu Module
- Cadenza Advanced Menu Module
- PowerPack Advanced Menu Module
- WordPress Navigation Menu Widget
Each of these modules will add any menu to any column or row within your page. Each module has slightly different settings for layout and responsive behaviors and are fully styleable, much more so than the Top Bar, Header and Footer locations described above. Those locations are global however, appearing on all pages of your site, whereas menus added through Page Builder Modules only appear on the pages where you use them.
Creating and Adding Custom Menus through the Page Builder gives you much more flexibility and control over organizing content and helping visitors navigate through your website.
You can also save your Custom Menu module and reuse it on other pages or locations through your site, when you use the Page Builder for those pages. Consult the section on using the Page Builder for more information.